MAG*I*CAL Calibration Specimen for Transmission Electron Microscopes
Magnification Calibration Standard for Transmission Electron Microscopes
This unique calibration sample can be used to perform all of the three major calibrations for a TEM.
- Magnification at all magnification ranges
- Camera constant
- Image-diffraction pattern rotation calibrations
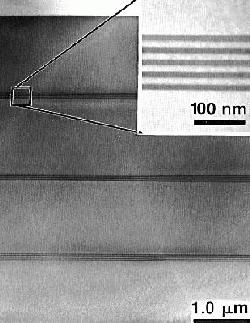
 The sample itself is an ion milled cross-section of a single crystal of silicon. In this single crystal are a series of atomically flat layers of Si and SiGe. They have been produced to electronic device quality by molecular beam epitaxy (MBE). The thickness and spacing of these layers are very accurately known since they have been directly referenced to the (111) crystal lattice spacings of silicon, which are readily visible right on the sample.
The layer spacings are designed so that the sample can be used to calibrate the entire magnification range in a TEM, from about 1000X up to 1,000,000X. No other sample in the world can cover this broad of a range of magnifications! Since the sample itself is a single crystal, it can also be used to perform the camera constant calibration and also the image-diffraction pattern rotation calibration.
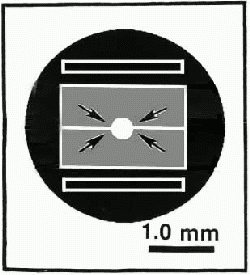
The arrows indicate the four possible regions of interest on the sample where the calibration marks may be found. Note that this cross-sectional sample consists of two pieces of silicon wafer epoxied face-to-face, with additional silicon added as a backing material to form a 3 mm disk. To find the areas of interest at low magnification, look for the epoxy line on either side, between the arrows (see image above).
The thickness of the sample:
The MAG*I*CAL is an ion milled cross-section, so the thickness of the sample varies from about 10 nm at the edge of the perforation (the thinnest regions closest to the perforation contain too much amorphous material at both surfaces to be useful) to about 50 µm at the very edge of the grid. The useful area for TEM purposes depends on the TEM accelerating voltage, but generally, thicknesses of up to 1 µm are usable in all modern TEMs. The "thickening" rate varies with each sample, but the angle of the sample material near the perforation is about 10° or less (for example, for 10°, the sample would be about 1 µm thick at a position about 5 µm in from the perforation).
Certificate of Calibration/Traceability:
The MAG*I*CAL calibration sample is manufactured from a single crystal silicon wafer, and so incorporates a fundamental constant of nature into the sample itself - the crystal lattice constant of silicon. All calibration markings on the sample are directly referenced to this natural constant. The sample calibration values can be verified by the user by observing the crystal lattice image of the silicon substrate and validating the calibrated markings. National Metrology Institutes (NMI's) such as NRC in Canada, NIST in the USA and NPL in Great Britain, etc., certify measurements as traceable to fundamental constants of nature. They do not certify these natural constants. The MAG*I*CAL® calibration sample does not require NMI certification since the calibration is directly traceable to a natural constant available on the sample itself, and all calibration spacings can be verified by the user. The crystalline lattice spacing is an intrinsic property of a material. For pure silicon, the spacing has been well characterized and documented by the scientific community. It is known to better than 6 decimal places (0.313 560 nm). This value can be obtained from the CRC Handbook of Chemistry and Physics 1, amongst other references.
As there currently is no NIST- traceable standard for high-magnification TEM being manufactured for this purpose, the next best thing is the MAG*I*CAL TEM calibration sample, which is internally calibrated against the lattice spacing of silicon, a fundamental constant of nature. This statement has been used successfully in the past in fulfillment of the requirements for certification and traceability (ISO certification). The MAG*I*CAL sample allows magnification calibrations across the entire magnification range of TEMs, as well as the camera constant calibration and the image/diffraction pattern rotation calibration. But one must always remember that is not a "NIST-traceable standard".
This product is fragile!
The MAG*I*CAL TEM Calibration Sample is fragile. It is brittle. And it is easily broken. We don't want a current or prospective customer to underestimate its fragility. However, this should not deter the careful TEM user from making use of this one-of-a-kind calibration sample and we do have many customers who have been using successfully and without incident for years. Breakage of the sample is not covered by our standard warranty. In order to reduce the chances of damage to the MAG*I*CAL sample, we recommend that for storage, it be returned to its membrane box shipping container. We recommend that the MAG*I*CAL sample is allowed to drop gently onto the membrane of the membrane box since if you are still holding the sample with tweezers when it touches the membrane, it could be slightly bent and summarily broken. If you accidentally break the membrane, rather than putting your MAG*I*CAL sample at risk, we would recommend purchasing a replacement membrane box at once.
1 CRC Handbook of Chemistry and Physics, CRC Press, Inc., Boca Raton, Florida 33431


